Why do 90% of apps fail within their first year? The answer often lies in skipping a crucial step: prototyping. An app idea is exciting, but it’s just the start. To transform that vision into a successful product, you need a solid plan that minimises risk and maximises potential. Think of a prototype as your app’s blueprint—a clickable, interactive preview of how users will experience your app. It’s the vital link between your original idea and the final, developed product. The prototyping process allows you to test the core functionality of your app, get valuable user feedback, and refine your design before investing in costly and time-consuming development.
This guide explains the purpose of a mobile app prototype, why it’s a game-changer, and provides a step-by-step guide on how to create app prototype. We’ll walk you through transforming your idea into a testable app blueprint that you can refine before embarking on full app development.
What is a Prototype and Why is it Essential?
A prototype is an early, testable version of your app that simulates how the final product will look and function. Unlike a static image, a prototype is a clickable simulation of your app’s user interface and user experience (UX). The main purpose is to validate your app idea, gather user feedback, and align on project requirements before expensive app development begins.
Why Prototyping is Essential for App Development
Prototyping is crucial because it significantly reduces the risks in the development process. By creating a prototype app development plan, you can:
- Validate your idea: Prototypes turn an abstract concept into a tangible experience, confirming that your app’s proposed solution truly solves a problem for your target users.
- Gather crucial user feedback: Putting a clickable app prototype in front of potential users allows you to observe their behaviour and identify usability flaws. Fixing these issues at this stage is 100x cheaper than fixing them after the app is coded.
- Align teams and stakeholders: A prototype serves as a universal language that clearly communicates the app’s functionality and user flow, ensuring everyone is on the same page.
- Save time and money: When you spot design weaknesses early, you avoid costly and time-consuming revisions down the road. It is estimated that fixing an issue in the development phase can be up to 100 times more expensive than addressing it during the design phase. To learn more about this, read our guide on how to reduce app development costs.
Low-Fidelity vs. High-Fidelity Prototypes
Prototypes come in two main forms, each suited for different stages of development:
- Low-Fidelity (Lo-Fi) Prototypes: These are simple, quick, and unpolished. They focus on the app’s core structure and flow, often created with paper sketches or basic digital UX wireframing. Think stick figures vs. detailed illustrations. Lo-fi prototypes are best for brainstorming and initial idea validation.
- High-Fidelity (Hi-Fi) Prototypes: These are detailed, realistic simulations that look and feel like the final product, including specific UI elements and animations. Built with professional design tools, they are best for final usability testing and presentations to stakeholders. A hi-fi prototype is often the last step before MVP development. For more tips on making your project budget-friendly, check out our insights on low-cost mobile app development.
Best Free App Prototyping Tools
Choosing the right tool is a key step in how to design an interactive app prototype. Creating a prototype is easier than ever with a variety of powerful and user-friendly tools, many of which offer free plans.
- Figma: A collaborative, web-based tool ideal for real-time team collaboration. It’s known for its powerful prototyping features and is great for all skill levels.
- Adobe XD: A robust tool that offers a seamless workflow for designers already in the Adobe ecosystem. Best for those with some design experience.
- Sketch: A popular design toolkit for macOS users, known for its clean interface and powerful features tailored for UI/UX design.
- Miro: A digital whiteboard platform excellent for early-stage prototyping, quick sketching, and brainstorming. Great for initial UX wireframing.
A Comprehensive, Step-by-Step Guide to Create App Prototype
Follow this detailed process to transform your app idea into a fully interactive prototype.
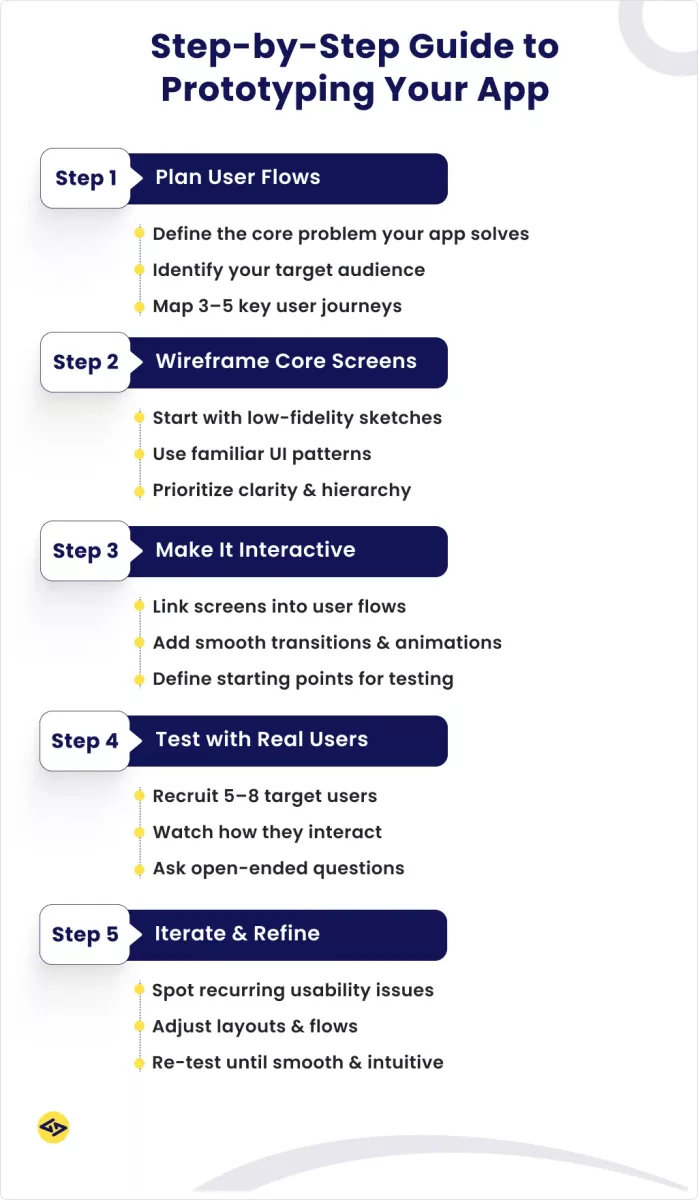
Step 1: Plan and Define Your User Flows
Before you open any software, a clear plan is your most valuable asset. This step ensures your app development prototype is focused and purposeful.
- Pinpoint the Problem: Start with a clear and concise problem statement. What is the single, core problem your app is solving? This will guide every decision you make. For a task management app, the problem might be: “Users struggle to keep track of their tasks and feel overwhelmed by their to-do lists.” For a mobile app for finding restaurants, the problem might be: “It’s hard to find local restaurants with a specific ambiance or vibe.”
- Identify Your Target Audience: Who are you building this app for? Understanding your users’ needs, behaviours, and pain points is critical. Are they students, professionals, or busy parents? To research this, consider sending out surveys, conducting short interviews, or analysing competitor reviews.
- Map Key User Journeys: Think through the most important tasks a user will complete. Create a visual map of these “user flows,” showing each screen they will see and every action they will take. For a task management app, a key user flow might be: Create Account -> Log In -> Add a New Task -> Mark Task as Complete. This map will serve as the blueprint for your prototype. Start by mapping out just 3-5 core flows.
Step 2: Design and Wireframe Your Core Screens
This is where you bring your user flows to life, focusing on structure and layout.
- Start with Low-Fidelity (Wireframes): On paper or in a basic digital tool, sketch out the screens from your user flows. Use simple boxes for images, lines for text, and circles or rectangles for buttons. Focus on the arrangement of elements, not their final appearance. Don’t worry about colours or fonts; this stage is all about placement and functionality. A good rule of thumb is to spend 30-60 minutes on each key screen.
- Follow Established Design Patterns: Use familiar UI patterns that users already understand. For example, a hamburger menu icon for navigation, a shopping cart icon for e-commerce, or a magnifying glass icon for search. This reduces user confusion. It also makes your app feel instantly intuitive.
- Prioritise a Clear Hierarchy: Arrange elements on each screen in order of importance. The most critical information and actions should be the most visible. For a task app, the “Add New Task” button should be front and centre. Use size, colour, and positioning to guide the user’s eye to the most important elements.
Step 3: Create Interactive Connections
This is where your static designs come to life. Using a tool like Figma, you’ll transform your wireframes into a clickable prototype by linking your screens together.
- Link Screens Together: In most prototyping tools, you’ll select a clickable element (like a button) and drag a connector to its destination screen.
- Simulate User Paths: Set the interaction details, such as the trigger (On click or On tap) and the action (Maps to). This creates a functional pathway for users to follow.
- Add Micro-Interactions (Optional but Recommended): To make the experience more realistic, you can add subtle animations or smooth transitions between screens. Features like Figma’s Smart Animate can create professional-looking transitions without much effort.
- Define Flow Starting Points: Set a “starting point” on a specific screen to help guide testers and stakeholders through a defined journey.
Step 4: Test Your Prototype and Gather Feedback
This is a non-negotiable step. Your prototype is a hypothesis—testing it proves or disproves your assumptions.
- Conduct User Testing: Recruit at least 5-8 people who fit your target audience. Give them specific tasks to complete (e.g., “Find and edit a task.”). Don’t guide them or tell them what to do. Observe their actions and see where they struggle.
- Observe and Listen: Watch closely how users interact with your prototype. Where do they hesitate? What do they click on? Listen to their thoughts and frustrations out loud. These insights are invaluable. Consider using screen recording tools for remote testing.
- Ask Targeted Questions: After the test, ask open-ended questions like, “What was the most confusing part of this process?” or “Did you expect that button to do something different?” Other good questions include, “How would you describe what this app does in your own words?” or “If you could change one thing, what would it be?”
Step 5: Iterate and Refine Based on Feedback
The final step is to use the feedback you’ve gathered to improve your prototype.
- Analyse the Results: Identify common themes and recurring issues from your user tests. If multiple people couldn’t find the “Settings” menu, that’s a clear sign your navigation needs to be rethought.
- Make Targeted Revisions: Go back to your design tool and make the necessary changes. Adjust layouts, add new screens for clarification, or reorganise your user flows based on what you’ve learned. Prioritise fixing show-stopping issues first.
- Repeat the Cycle: Prototyping is an iterative process. Once you’ve made your changes, test the new version with a new group of users. This cycle of building, testing, and refining is what leads to a truly polished and successful app. The process of iterating on your prototype should continue until the core user flows are smooth and intuitive. At that point, you’re ready to move to MVP development. For an example of a successful product, read about how to build a mobile app like Beli.
Key Advantages of Using a Prototype for Funding
A prototype allows you to demonstrate the value of your app in a clear and convincing way, which makes it easier to get investment.
- Show, Not Just Tell: Investors see hundreds of ideas. With a clickable prototype, you can literally get the app into their hands, so they can feel its worth. This is much more convincing than just a word-of-mouth pitch. If you are a startup looking to secure funding, read our guide on how to find an app developer for your startup.
- Present Vision and Competence: A high-fidelity prototype proves to investors that you are serious about your idea. It shows you have thought hard about the user experience, have a clear vision, and can deliver on that vision. Studies show that startups with a well-developed prototype have a significantly higher success rate in securing funding.
- Validate Market Potential: Showing that you’ve tested your prototype with real users and incorporated their feedback proves that your app solves a real problem. This data-backed approach reduces the perceived risk for investors.
For further insights into ensuring your app’s success, explore our article on top strategies for user engagement.
Conclusion: From Vision to Validation
Creating an app prototype is one of the most essential steps toward project success. It is not just a creative exercise; it is a strategic process that reduces risk, saves resources, and proves that your idea will work with actual user data. This step-by-step guide will help you confidently take your basic app idea and turn it into a working, interactive framework ready for development.
Begin with clarity and purpose, then prototype your way to a brilliant user experience.
If you need professional assistance to build an app prototype or for your full mobile app development, take a look at iCoderz. As a leading company in the field, we specialise in a range of services, including mobile application development and UI/UX design services.
Ready to bring your app idea to life? Contact us to schedule a free consultation today!
Transform Your Idea Into Reality!
Learn how to create app prototype that helps you design, test, and launch faster.